 Save
Save The smell of freshly baked cake always fills my kitchen on graduation week, and last year, as confetti stuck to every surface, these cake pops in school colors became an accidental centerpiece. The mixing bowls were crowded out by extra fondant, and my hands turned blue and gold from swirling chocolate, but every imperfect pop was a tiny celebration in itself. I still remember laughing at how the sprinkles seemed attracted to the floor more than the cake. The sound of popping candy melts and the chatter of proud parents made the prep feel less like work and more like a party behind the scenes. What started as a simple dessert turned into a joyful ritual marking milestones in edible form.
When my cousin graduated last spring, I made these cake pops in her university colors and packed them into a box that went straight from kitchen to celebration. We joked about who could make the neatest graduation cap, and the living room echoed with laughter as we attached mini chocolate chip tassels. Making them felt like sharing a little edible encouragement, and seeing everyone nibble pops through speeches made the day sweeter. Even our family dog managed to swipe a sprinkle or two off the counter. That day, the kitchen became a hub for both treats and teamwork.
Ingredients
- Cake: A box mix makes prep quick, but a homemade cake (cooled completely) gives you control over the crumb texture and flavor. If you're pressed for time, boxed cake is a lifesaver.
- Cream cheese or buttercream frosting: Cream cheese frosting adds tang, but buttercream brings rich sweetness and is easier to mix evenly with the cake.
- Candy melts in school colors: These give pops their festive look. If they seem thick, a touch of vegetable shortening helps with dipping.
- Vegetable shortening: Just a bit can thin out the coating and make your pops smooth—don't skip if you're struggling with lumpy chocolate.
- Sprinkles, edible glitter, colored sugar: The more playful, the better—they cover imperfections and match your school's theme.
- Lollipop sticks: The classic cake pop handle—make sure they're sturdy so your pops won't collapse.
- Mini chocolate chips: Perfect for tassels or little accents; they cling well if attached while the pops are still wet.
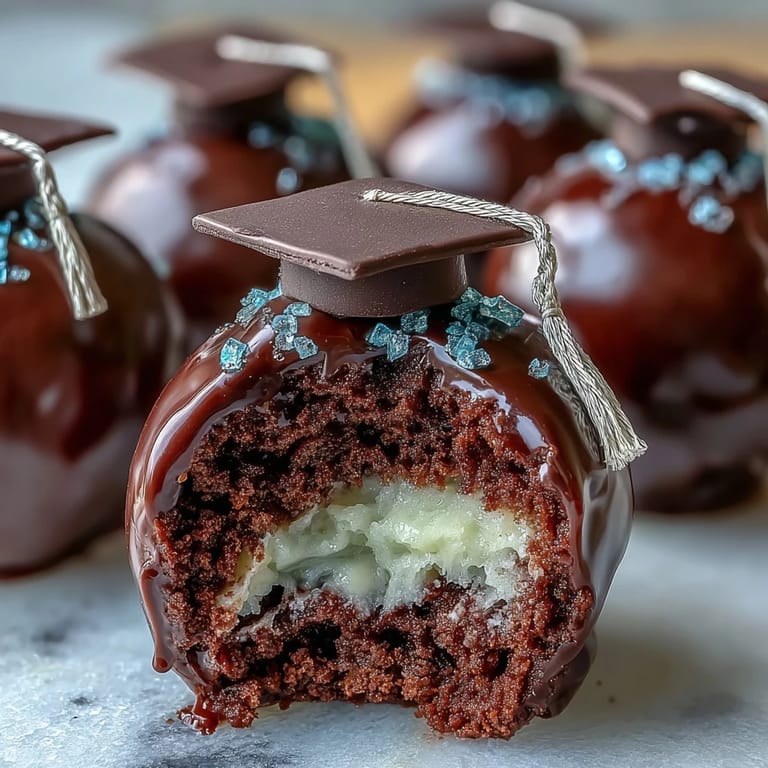
- Fondant in school colors: Use for cap decorations if feeling crafty—rolling and cutting tiny squares turns the pops into tiny diplomas.
Tired of Takeout? 🥡
Get 10 meals you can make faster than delivery arrives. Seriously.
One email. No spam. Unsubscribe anytime.
Instructions
- Bake and Cool the Cake:
- Bake your cake according to the mix box or homemade recipe. Let it cool fully; the kitchen fills with sweet aroma as you wait.
- Crumble and Mix:
- Use your hands or a fork to break the cake into fine crumbs in a bowl. Sprinkle the frosting in, gently working it until the mixture grabs together like damp sand.
- Shape the Pops:
- Scoop out level tablespoons and roll them into neat balls. The mixture should feel soft but hold its shape—messy fingers are part of the fun here.
- Chill the Balls:
- Set the formed balls on a lined tray, cover them, and refrigerate for at least an hour or freeze for twenty minutes. This helps them firm up so they don't slip off the stick.
- Melt the Candy Coating:
- Microwave candy melts in intervals, stirring so it’s smooth; if too thick, drop in vegetable shortening and mix until glossy.
- Stick and Dip:
- Dip each lollipop stick tip into the melted coating, then insert halfway into the cake ball. This creates a glue so the pop won't fall apart later.
- Coat Each Cake Pop:
- Immerse the whole ball in melted candy, swirling gently and tapping off extra. Work quickly so decorations will stick.
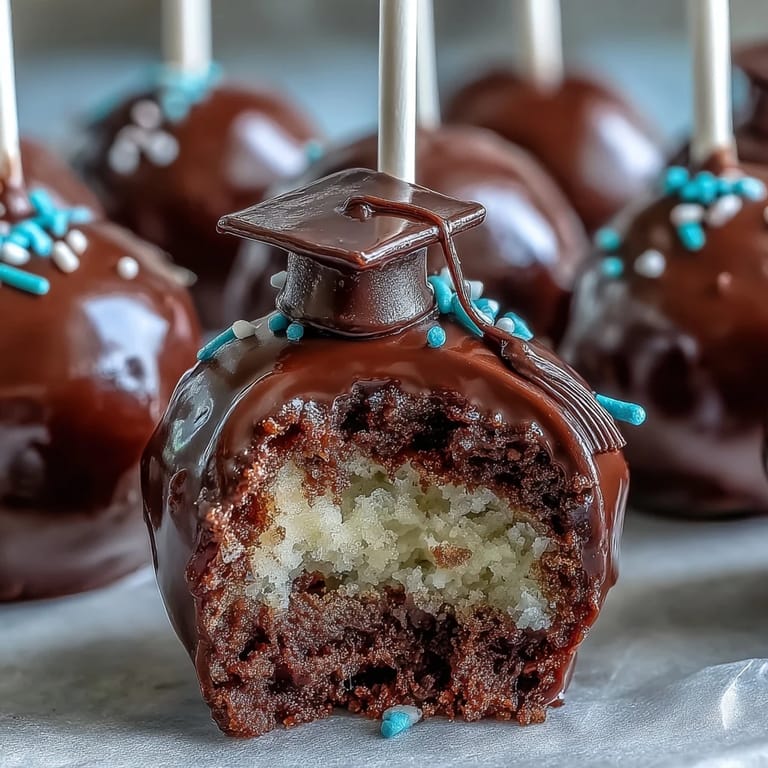
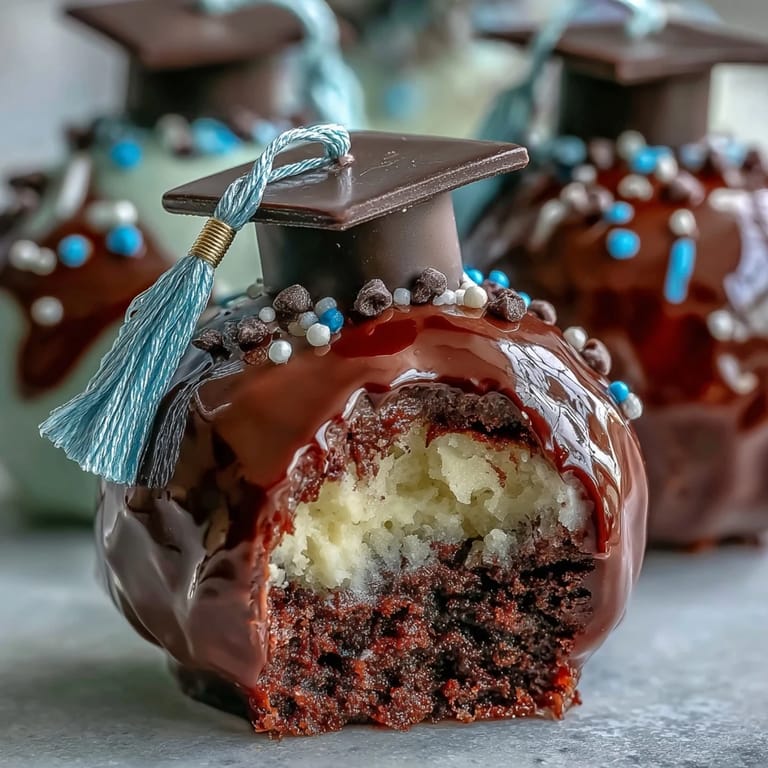
- Decorate:
- While still wet, sprinkle and dust with your favorite edible glitters and sugars, or press a fondant square on top for a cap before attaching a chocolate chip tassel.
- Set and Finish:
- Place each pop upright in a styrofoam block or cake pop stand. Let them cool to set the chocolate and make the pops ready for serving.
 Save
Save One quiet night before graduation, I caught my niece rearranging cake pops into a pyramid, critiquing which caps looked "most official." Suddenly, dessert stopped being just a treat and started feeling like a badge of pride, colorful and playful—each pop handed out with hugs. There was something quietly lovely about watching her hand out edible diplomas to friends, each bite marking a milestone.
Bringing Everyone Together
Making these pops turned into a group project: siblings handled sprinkles, friends mixed frosting, and somebody always debated the perfect school color shade. A bowl of melted chocolate became a lively centerpiece as everyone dipped and decorated, joking about whose pop needed a retake. Even cleanup felt lighter when everyone shared the mess and the laughter.
Getting Creative with Decorations
The possibilities for decorating are nearly endless—sometimes we ran out of colors before ideas. Experimenting with edible glitter or drawing graduation years with markers made the pops feel extra personal, and mistakes were quickly disguised by a swirl of sprinkles. Kids especially loved turning plain cake balls into miniature tasselled caps, and their enthusiasm made the process feel magical.
Make-Ahead and Storage Hacks
Whenever I made these a day early, I let the pops set completely before packing. They stayed perfect in airtight containers in the fridge, ready to pop out for any celebration without the last-minute scramble.
- Let the coating fully harden before stacking or wrapping.
- Use parchment paper between layers to prevent sticking.
- If serving outdoors, store in a cool spot to keep the pops from drooping.
 Save
Save Graduation cake pops bring a bit of extra spirit to milestone moments. Whether you’re decorating as a team or gifting a batch, each pop is a sweet reminder of achievement—so enjoy every bite!
Recipe FAQs
- → How can I match the pops to my school colors?
Choose candy melts or white chocolate colored with food coloring to reflect your school’s colors. Decorations like sprinkles and fondant also let you personalize each pop.
- → Can I use homemade cake instead of mix?
Absolutely! Use a fully cooled homemade cake and crumble it for the base, then mix with frosting as directed.
- → What’s the best way to decorate for graduation?
Top pops with a fondant square for caps, attach a mini chocolate chip tassel, and use coordinating colors or edible glitter for extra festivity.
- → How long do cake pops stay fresh?
Store pops in an airtight container at room temperature for three days, or refrigerate for up to a week.
- → Are there gluten-free or allergy-friendly options?
Choose gluten-free cake mix and check all ingredient labels for vegan or allergy-friendly alternatives, especially in frosting and different coatings.
- → What’s the ideal way to serve these pops?
Stand them upright in a styrofoam block or display holder for a colorful centerpiece and easy serving.